
Master the Ultrasound Guided IV (short axis)
Don’t do it blind!!!
Why do anything “blind” when you can see subcutaneous structures with ultrasound???

Intro: Placing an IV through Ultrasound Guidance is like...landing a plane on an aircraft carrier...at night, using instruments only. Easy! Right?
Let's break it down into 3 steps (because the human brain can't reliably remember long lists):
Find the runway. Selecting the least-worst vein for cannulation. Many factors here: Depth, diameter, surrounding structures, prior attempts, etc.
The approach. Easy as the rules of a right-angle triangle.
The landing. Find the tip, don't lose the tip, chase the tip.
For most here, placing an IV "blind" is not a new skill, so I am not going to re-teach you this process. If it is a novel task for you, I will show you my "2-handed" technique. Those of you with lots of experience and great muscle memory may choose not to adopt a new technique for advancing the catheter after cannulating the vessel. If you have a super slick one-handed cannula advancing, needle retracting technique, by all means continue to do it. I strongly recommend the 2-handed technique of placing the needle in the vein with your dominant hand, and THEN advancing the catheter over the needle to cannulate the vessel. That looks like this...gif of 2 hand techique.
One thing that you will hear me say repeatedly is that you should use the ultrasound images to verify that you are in the vein, NOT the presence of a flash. Picture of the flash with an x through it.
Let me say that again, visualize the needle in the vein on the ultrasound screen, NOT by watching for a flash in the hub of the needle.
Let's take an oath...I YOUR NAME do solumnly swear that I will confirm my IV needle is in the vein by visual confirmation on ultrasound screen, not by watching for or seeing a flash in the angiocatheter.
Sonography 101 (more like 100 1/2)
Step 1: Select the right transducer (I mean probe). Use the high-frequency linear transducer (I mean the small flat one, not the "heart" or "abdomen" one). Every machine has different knobs and buttons. Most now have no knobs or buttons, only touch screens. Start poking your touch screen until you see a button that says "probe". Then, you will probably see buttons like "MSK" or "Vasc". These change the depth and gain and other settings to optimize the view for the structures that you are seeing. Even if you pick the wrong setting, with your incredible knowledge by the end of this session, you will be able to adjust the depth and gain to what you want.
Step 2: Select the depth - go deep (4 cm), to find the vein. Then, narrow down (to 2.5 cm).
Step 3: Adjust the volume (gain) for your viewing pleasure. Some people like it loud, some like it soft. Go way up and way down on your gain and then narrow in on the level you like.
This is a skill that is much needed in any ED. There are always patients who are difficult to access whether because of IVDU, chemotherapy, burns, or just tortuous veins. Being a PA who can save the day with an U/S guided IV, is a way of showing your value.
My biggest tip here is the same as every procedure...It's all in the setup. If you're prepared for success, you will be more likely to achieve it. If you rush to get the needle into the arm without getting your supplies, selecting the best vein, or visualizing the approach, you are much less likely to hit your mark and cannulate.
Bonus tip!!! As a novice, when able, I would place IVs on “normal” patients who did not have a history of difficult access to “practice” my ultrasound guidance skills. Of course, this was only in patients who needed an IV, but I would ask nursing staff not to place an IV so that I could use ultrasound to visualize and place lines on patients with “normal” vein size, location, elasticity, etc.
I highly recommend beginning with the short-axis or transverse plane approach as illustrated here. While the longitudinal plane view has its advantages, the biggest disadvantage is that it is not easy to keep the vein and needle in the picture as very little movement will cause it to disappear.
As you can see in the blurry image below, the “beam” of sound emitted from the ultrasound probe is very thin, and the needle will not show up on the screen if it is just a millimeter to the left or right.
From: Ultrasound First, Second, and Last for Vascular Access (definitely worth a read)
The major drawback of the transverse view is that the needle only appears as a dot on the screen no matter which part of the needle you are looking at (i.e. the needle tip appears the same as the middle of the shaft) as seen here.

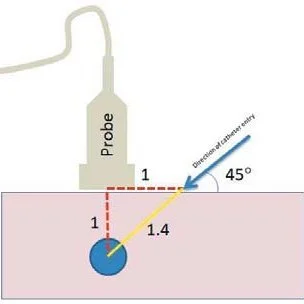
The solution is geometry!!! Yes, that class in high school you never thought you needed!!! Good Ol’ Pythagoras to the rescue.
Use the depth of the target vein as a guide for where to place your needle on the skin. When the distances are the same, and the angle of the needle is 45 degrees, then you will see the tip of the needle enter the vein.
This video might help as well.
Now that you have a good concept of how to use the transvers approach to the vein while continuously visualizing the needle, its’ time to execute.
MY STEPS FOR SUCCESS...
STEP 1: The set-up.
Get the patient's arm on a side table abducted away from their body. Put the table at a comfortable height. I've seen PAs bent over for 15 min with the patient's arm on the bed wrestling to find the right vein while their back aches. Don't do this.
BONUS: Wrap the patient's arm in warm towels while you gather supplies. Theoretically, this might bring more blood flow, but also makes you look like you care about the patient's comfort.
Don't forget to get consent and talk them through the procedure. Deep vein cannulation is slightly more painful than superficial IVs and the deep veins often run with arteries and nerves. This is not completely benign. You could hit an artery or nerve, but of course, you'll make sure to identify those with the ultrasound first!
Make sure you have all the supplies you need including at minimum:
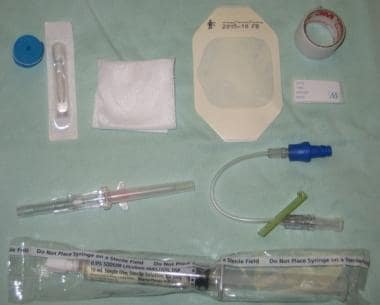
From: Emedicine Intravenous Cannulation Periprocedural Care
a long angiocath (my hospitals have the 1.88 in type),
tubing, flushes, and especially
gauze (It is really important to have something to wipe off all the gel so you can stick the tape), and
Tegaderm to the skin to secure the line.
From: NEJM Ultrasound-Guided Peripheral IV Placement
STEP 2: Find the best vein.
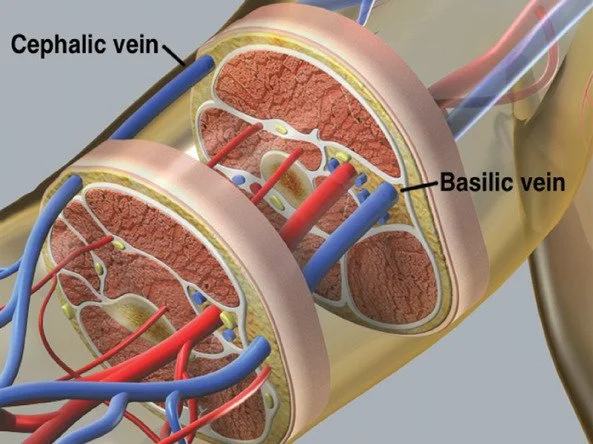
Now you're ready to actually look for a good vein. I start in the antecubital fossa and work my way up. I like to go lateral first to look for the cephalic vein because it doesn't run near any arteries, then I go medial for the basilic vein. Most nurses have already tried the median cuboid so it's often out of the running. The brachial vein is often part of a neurovascular bundle including the artery and nerve so identify these (artery is non-compressible and nerve looks like a honeycomb) before attempting to cannulate.
Obviously make sure the vein you select is compressible and should be away from any other structures like arteries or nerves. If you must select a vein next to an artery
Select the best vein. I often spend several minutes looking up and down the arm for the best vein. Usually, I do this even before placing a tourniquet. I want a plump, straight vein, less than 1.5 cm from the skin. This usually means I get gel all over the arm, I wipe all of that off after I've made my selection and just use another dab of sterile gel for the actual procedure.
I also like to make sure the ultrasound probe is perfectly perpendicular to the vein. This means, as I run the U/S probe up and down the arm, the vein stays right in the middle of the screen. Often times veins will twist and curve or bifurcate as is seen in the image below. As the probe moves distally down the arm the two veins move across the screen meaning the probe is NOT perpendicual to the vein.
Find a straight segment. It will be much easier.

From: ALiEM Techniques for Ultrasound-Guided IV Placement
STEP 3: Cannulate the vein (sterilely, please)
Now that I'm ready, I place 2 tourniquets above the site. One is just not enough, so grab two together and place it like you would a single tourniquet.
Also, clean the skin (I use chlorhexidine), and switch to the sterile lube (and a sterile probe cover if needed).
Find your vein again and place it exactly in the middle of the ultrasound probe. There is a little marker on the screen that corresponds to a mark on your probe. Make sure you are exactly perpendicular to the vein again.
Use Pythagorean's theorem to select the spot on the skin you will place the needle.
Say what??? We went over this, but I’ll illustrate again. If the vein is 1 cm deep (there are markers on your U/S screen), then back up 1 cm (from the middle of the probe), and direct your needle at a 45 degree angle at the vessel. If done perfectly, you will see the needle tip enter the vein without moving your probe. This might not be perfect so just tilt your probe back and forth but don't move it on the skin.
Watch the needle tip enter the vein. Probably the hardest part of the procedure is making sure the little dot you see on the screen is the needle tip and not part of the shaft (while your needle tip is digging around somewhere deeper in the arm). I like to watch the wall of the vein compress as the needle hits it then pop back up once the needle enters. This will correspond to the flash of blood in the angiocath, but I have found this takes my eyes off the screen, I will probably lose that needle tip.
STEP 4: The chase.
From: ALiEM Techniques for Ultrasound-Guided IV Placement
Now that I am in, I flatten the angle of my needle and use the "chase technique" to ensure I am only looking at the tip of the needle. I move the probe just a tiny bit proximal so I no longer see the white needle in the vein and then advance then needle until it appears on the screen. I direct it in the very middle of the vein and repeat. Move slightly proximal, until the vein is empty, then advance the needle into the middle of the vein. In an abundance of caution, I do this probably way more times than I need to but it gives me that sense that I am definitely in the vein.
Then advance the catheter and withdrawn the needle, connect tubing, and go crazy securing this thing in place!